Rebelstar Raiders (4e Quest)
Rebelstar Raiders is a quest for the Rebelstar campaign setting, using the Future sourcebook.
Background[edit]
The PCs are members of a resistance group known as "Rebelstar". Their aim is to destroy a powerful galactic organization that has enslaved humankind, Redshift. Rebelstar is lead by a brilliant politician, scientist and engineer, Joe Capricorn. In this first adventure, Capricorn has planned a daring raid on the orchestrator of Redshift's tyranny - a massive proto-brain computer, Main-Comp. It has been traced to a location on a terrestrial planet, Pi. A highly trained group of desperate men led by three Clones of Joe Capricorn boarded two customised ships, the Startingale and the Freedream. Able to avoid detection and out run the Cooperative Battle Cruisers they were thus capable of penetrating the defences of Main-Comp.
Part One: Moonbase[edit]
Introduction[edit]
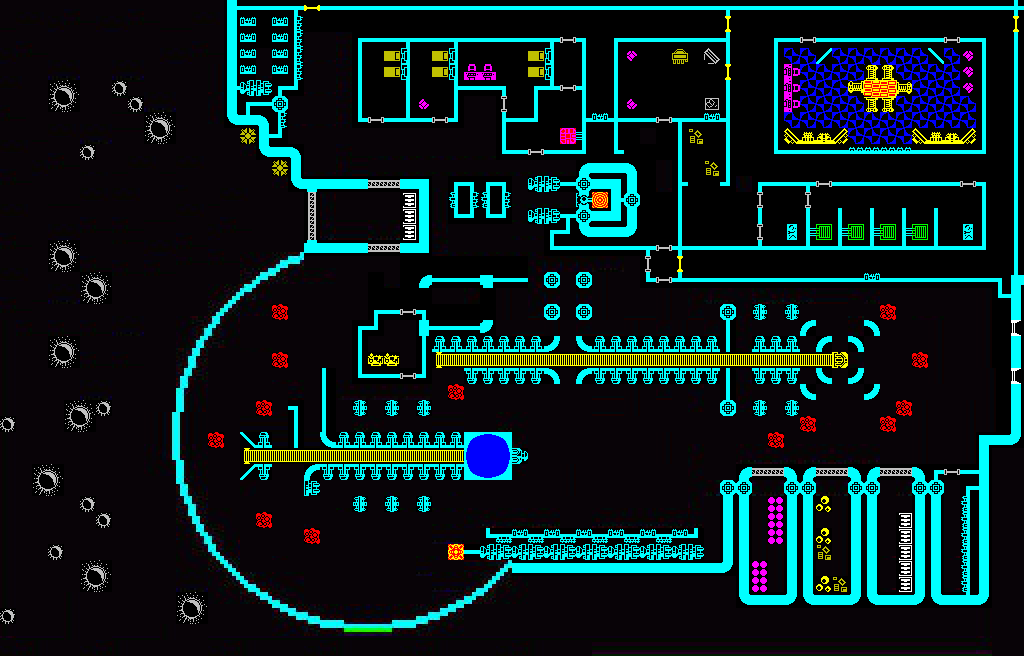
Pi's planetary defenses consists of several meson accelerators which are capable of destroying any ship attempting to land on the planet. The control installation is a disguised mining station on the small moon, Spyder. A squad of raiders are to be dropped from the Starlingale, infiltrate the station and disable the defense computers. The station has fortified walls and strong security at its airlocks, but a weak spot has been identified: The dome over the ore processing facility has thinner walls and may be breached with explosives.
During the infiltration, the Starlingale will attempt to land at the station's dock to prepare for the Raider's escape.
- Preparation
The PCs may select one or more companion characters from the Raider's roster to bring the squad size up to 5 members.
It is assumed that each character has either a vacuum suit or storm armor, or are otherwise be able to survive in airless conditions.
Rebelstar's resident weaponsmith, Dino, assigns the following equipment to the party:
- 1 x Photon Repeater
- 1 x Starbolt
- 2 x breach grenades
Encounter 1: The Breach[edit]
- Standard Encounter (500 - 550 XP)
The squad must decide where they wish to be dropped. Two possibilities are:
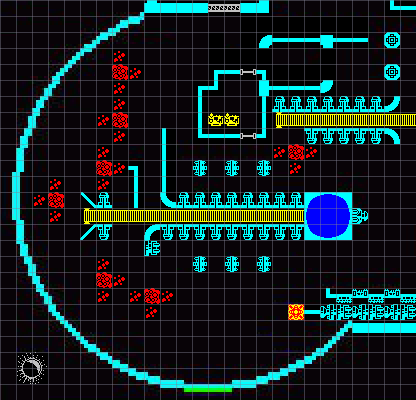
- Some distance from the station. This can be done covertly. Approaching the station covertly requires everyone to make a DC 9 Stealth check: if at least half the party succeed, then the operatives will be unaware of their approach. This will grant the PCs a surprise round. The station can be breached at the base of the ore-processing dome. If for any reason the main airlock is approached, the squad will be attacked by two Auto-Guns and the operatives will be alerted.
- On top of the ore-processing dome. As this requires a fly-over by the Starlingale, it cannot be achieved covertly. However, being able to attack enemies in facility from a breach in the ceiling has its advantages: The PCs will gain a cover bonus whilst firing from the breach, and the low gravity means they can jump safely into the interior. A charge action can be taken to jump down from the breach into melee.
To breach the dome, 25 hit points worth of damage must be inflicted against the wall, which has Resist physical 5. If the wall is not breached in the course of one turn, the players do not get a surprise round. Weapons with the demolition mod, such as the Starbolt will cause double damage against the wall.
- Creatures
- 2 x Mining Robots (Level 1 Elite Brutes, 200 XP each)
- 4 x Technicians (Level 1 Minion Skirmishers, 25 XP each); their names are Spanner, Technical Tim, Zorgon and Borisov.
- A further two technicians (Jevarrel and Rudolf) will arrive through a security door (off-map, to the north east)if at least one mining robot is still active at the beginning of round 5. (25 XP each)
- Terrain
- Ore Pile: Difficult terrain; Challenging terrain, requiring a DC 10 Acrobatics check to avoid falling prone. Characters in a pile of rubble receive a cover bonus.
- Rubble: Difficult terrain, in the squares adjacent to an ore pile.
- Conveyor: Creatures on a conveyor at the end of their turn are pushed 5 squares to the east. The first conveyor drops its contents into a froth floatation vat, the second into a crusher. The Mining Robots may use their ore loading protocal to throw victims onto a conveyor belt.
- Froth Floatation Vat: This 3 x 3 area is difficult terrain. Creatures in the vat at the beginning of their turn suffer 5 corrosive damage.
- Power Node: A successful attack (All defenses are 11) will rupture the power node. The explosion is a Close Burst 3 (all creatures in burst); +4 vs. Reflex; 2d6 + 5 electric damage; Miss: Half damage.
- Crusher: Whilst the second conveyor runs off the edge of the battle map, this is included should the fight end up moving. Creatures entering a crusher are restrained (save ends). If a creature is in a crusher at the end of their turn, they suffer 1d10 + 6 physical damage.
- Environment
- Bright light.
- Low gravity
- Vacuum: On the first round of combat after the breach, all creatures inside the dome are pulled 3 squares towards the breach at the beginning of their turn. On the second round, sealing hatches begin to close the breach; all creatures inside the dome are pulled 1 square. On the third round, the breach is sealed: Non-animate creatures trapped outside will die once they run out of breath.
- Rewards
The technicians and mining robots were not carrying any credits, but the locked store rooms to the south east can be accessed with a successful DC 9 Mechanics check. Inside there is one Prototype (amidst the miscellaneous fuel barrels, vaccuum suits and robot spare parts).
- Conclusion
Once the ore-processing facility is cleared, the squad may take a short rest. Remember that under the Future rules, this means:
- Regain the use of all encounter powers and Second Wind,
- Hit Points restored to maximum,
- If a character used a weapon more than once that requires ammunition, they are now out of ammo.
- Progress
The party may either proceed either:
- North into the operative's quarters (Encounter 2a)
- East through a security door to the sentry robot bay access corridor (Encounter 2b). Opening the door requires a successful DC 13 Mechanics check, or 25 hit points of damage to be inflicted (against resist physical 5). If the party take this route, it should be immediately apparent that the straight, open access corridor is an extremely risky route and they should be given opportunity to take the North route instead.
Encounter 2a: Operative's Quarters[edit]
- Average Encounter (525 XP)
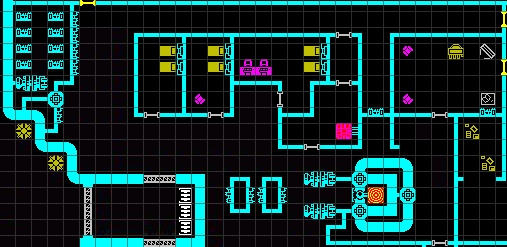
Between the processing facility and operatives' quarters is the power generator. From here, the party can move to:
- The main airlock to the west. This can be opened from the interior, but should anyone exit this way before the control room is captured, the two auto-guns outside will open fire.
- West foyer which loops round to the north access corridor. This leads to a Control Room Security Door 1, and a north entrance to the kitchen.
- Doors to bedrooms 1, 2 and 3
- The southern entrance to the kitchen.
- Creatures
- 4 x Security Guards (Level 1 artillery; 100 XP each): Fick Nick, Suggs, Josrin Gale, and Jagger Hut
- 1 x Sentry Robot (Level 2 artillery; 125 XP)
The sentry robot patrols the foyer and access corridors. The security guards will use the cover of their bedroom doors to lay down fire; the players will probably use terrain around the power generator if they choose to engage at range, which can be bad for them.
- Terrain
- Beds, chairs and desks all provide cover.
- Power conduits near the generator - every square to the west of the generator is at risk.
- Generator can be disabled with two successful DC 13 Mechanics checks. The building switches to emergency (dim) lightning, and the power conduits are no longer a hazard.
- Environment
- Bright light
- Low gravity
- Rewards
- Each security guard was armed with a laspistol and vacuum suit.
- Weapons lockers in the bedrooms provide an ammunition cache.
- One of the security guards was carrying a keycard that will open any of the 3 security doors leading into the Control Room.
- Progress
Once the operatives' quarters are cleared, the party may have a short rest. They may then use the keycard to open:
- Security Door 1 - between the north access corridor and the control room.
- Security Door 2 - between the lounge and the control room. The lounge can be accessed by squeezing past the power generator into a maintenance room, although this isn't immediately apparent (Perception DC 9).
- Security Door 3- between the ore-processing facility and the sentry robot bay access corridor.
Encounter 2b: Robot Bay Access Corridor[edit]
- Hard Encounter (625 XP)
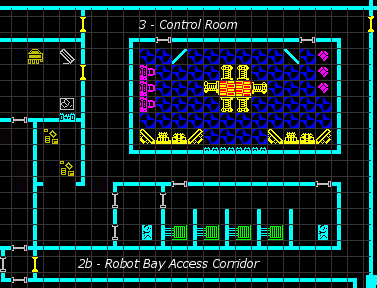
The access corridor is simply a long corridor with the party and one end and sentry robots at the other. There is scant cover, which can be bad news if the party has limited ranged combat options.
- Creatures
- 5 x Sentry Robots (Level 2 artillery; 125 XP each)
- Terrain
The DM can place a few items of cover in the corridor at their discretion.
- Environment
- Bright light
- Low gravity
- Droid bay (the green squares on the other side of the north wall) - A robot standing on a droid bay heals 5 hit points at the start of its turn. The sentry robots will certainly use this to their advantage.
- Rewards
- None
- Progress
The party can pass through the Droid Bay and enter the control room.
Encounter 3: Control Room[edit]
- (525 - 575 XP)
The control room has surrounding hallway - the party will enter this either from the northwest (if they went through the operative's quarters) or the south (if they went through the robot bay). The control room can be entered through two doors in the northern hallway. The party's goal is to disable the defense computer.
- Creatures
The security guards and technicians are in the control room. The sentry robot is patrolling the hallway. By now, they will be fully aware of the party's approach. The guards have taken cover behind the workstation and computer banks. The sentry robot stands against the north wall to shoot intruders if they pass the energy shields (using delay actions).
- 2 x Technicians (Level 1 Minion Skirmishers, 25 XP each) - Jevarrel and Rudolf, if they did not appear during encounter 1.
- 4 x Security Guards (Level 1 artillery; 100 XP each): Frog, Len Gore, Ruskin and Jaffa Gate.
- 1 x Sentry Robot (Level 2 artillery; 125 XP)
- Terrain
- The workstations (purple on map) provide partial cover.
- One guard adjacent to a workstation can alert the sentry robots at the robot bay, if they have not already been destroyed. This takes two standard actions. If alerted the first appears in two turns, and they arrive one per turn thereafter.
- A PC adjacent to a workstation can hack it with a DC 13 Science check. This takes a standard action, and a success will stun all security robots (no save).
- Computer banks (yellow on map) provide superior cover.
- Energy Shields (blue diagonal lines on map) have been erected near the doorways. They block line of effect but not line of sight. 10 electric damage will disable a shield.
- Defense Computer (red and yellow on map, center of room). This can be disabled by attacking or hacking it. If attacked, it has superior cover from the computer banks; AC 14, other defenses 12; immune to psychic and toxic damage, and forced movement; 30 hit points. Hacking it takes 3 successful DC 13 Science checks. This stuns all security robots (no save), and remaining personell with either surrender or flee.
- Environment
- Bright light
- Low gravity
- Rewards
- 100 XP quest reward if the defense computer is disabled.
- Ammunition cache
- 200 credit's worth of tokens.
Back to Main Page → 4e Homebrew → Quests
Back to Main Page → 4e Homebrew → Campaign Settings → Rebelstar
Back to Main Page → 4e Homebrew → Sourcebooks → Future


